Monday, May 16, 2016

The Adventures of Luhu Bird

Luhu Bird - Snow Bum


If you are following me on Facebook, Instagram or Twitter you have, by now, been introduced to Luhu Bird.  He's just a cute little bird looking for adventure and I am having a lot of fun seeing what he is going to do next!

So far he has been a Snow Bum and today he is going to the beach to be a Beach Bum!


Luhu Bird - Beach Bum


He has his swim ring and his flippers and he can hardly wait to get out there and play in the water.  

My sister asked me where I got the inspiration for me and to be perfectly honest I don't remember.  I just remember that one day about a year and half ago I sat down and drew a picture of him.


Luhu Bird when he first hatched

I knew that I wanted to translate him into a counted cross stitch project but that didn't happen until more recently. 

Luhu Bird becoming a cross stitch pattern

He is a fun and fairly quick little cross stitch pattern to do.  Which, I have to admit, is my favorite kind of pattern to stitch.  And now you can stitch him too!  The pattern for Luhu Bird Snow Bum and Luhu Bird Beach Bum are both available at my Etsy shop.  Just click the links and you'll be there!  

Thank you for stopping by!  I hope you have a great stitchy day!!!

Thursday, May 12, 2016

Sun, Moon and a Freebie!


Sun and Moon Sampler - Luhu Stitches
                           
At last, I am so happy to be introducing and telling a little of the stories behind the patterns I am offering in my Etsy shop, Luhu Stitches. The first piece is a sampler I designed about 15 years ago. If you would like to know a little of what inspired the design you can read about it here.

I also thought it would be fun to show you a little of the process of designing a pattern, at least for me. The first step is brainstorming and sketching, which I usually do with colored pencils.

It begins with doodling

Many times I find that my sketches don't translate very well to a grid so there is a little redesigning to do on graph paper.  In the old days I would use colors that most closely matched the threads I wanted to use and color in my graph paper accordingly.


Then I do some graphing

I would then label the colors with their corresponding thread codes.  Now 15 years ago this is when the stitching would begin.  Now I do things a little differently, I am not as detailed in the hand graphing and I do the main pattern work on the computer.


Then on it goes to the computer
After I've input my design on the computer I print out the design and stitching begins.

I like to stitch up my designs before making them available online in case the colors don't look like I want them to or a stitch formation needs adjusting.  It has been my experience that things can look great on the computer and not so great when actually committed to fabric and thread.


There were some adjustments that went into this design, but I like the way it finished up and I hope you will too!

And just in case you want to give it test run I have a little freebie for you!

Mini Moon Magnet by Luhu Stitches

Here is a magnet I made using one corner of the sampler.  And you can download the pattern for it HERE!

I added checkered border to the design and lost all the half stitches due to the fact the I used Janlynn Vinyl-Weave and there is just no making half stitches with that. I was worried about making the French Knots but they turned out to be no problem at all.

To make your Mini Moon Magnet you will need the following supplies:

           - Janlynn Vinyl-Weave Fabric, 14 count
           - DMC threads indicated in free PDF download
           - size 22 Tapestry needle
           - scissors
           - 1/2 inch wide strip magnet (can be purchased at any craft store)
           - glue gun and glue stick

After you have finished stitching your moon motif trim off any excess fabric. If you look at my example in the above picture you will see that I left a "one stitch" border.  The great thing about the vinyl-weave is that it doesn't fray.

Warm up your glue gun.


Now turn your moon over and from your magnet strip cut two one-inch sections of magnet.  (If the strip is self adhesive you can try getting it to stick with that, however in my experience the adhesive does not work well with thread and other textiles.)  Peel off any paper that may be on the magnet and apply some of your hot glue to the magnet and place on the back of your moon motif as pictured.


 Let cool, turnover and now you have a cute little magnet for your fridge or magnet board or wherever you choose to use it!  If you have any questions please comment below.

A happy moon!
I hope you enjoy your Mini Moon Magnet and I hope you will be by to visit me at my Etsy shop, Luhu Stitches!

Thanks for stopping by!!!

Wednesday, May 11, 2016

Grand Opening of Luhu Stitches

Woohoo!!!!

I did it!

I have officially opened my Etsy shop Luhu Stitches!


This is the header for my shop

I can't wait for you to see the three patterns I posted today so I thought I would give you a quick snap shot of each.

Aunt Bea
This is Aunt Bea.  She is a little chicken who patiently sits in her nest giving an occasional squawk to let you know that she's hard at work.


Luhu Bird
This is Luhu Bird.  He's a little chick who is ready for any new adventure. Right now he's in his knit cap and earmuffs, ready for a day in the snow but he's planning on doing a lot more throughout the year.  Keep your eye out for this little guy.


Sun and Moon Sampler
And finally (for now) this is my Sun and Moon Sampler which includes the assurance that Jesus Christ is never changing. 

Please come on by and pay a visit at the shop.  While there is not a lot in stock now there will be regular additions and I hope you won't miss any of them. 

And visit me back here tomorrow.  I'll be writing more posts over the next few days talking about each of the above patterns and the design process.  

Thanks for stopping by!


A New Beginning in Thread Painting

This is my first cross stitch project.


You may recognize it from my last post. It is the one that started my love affair with cross stitch. 

To be certain it is an affair that has waxed and waned over the years yet still one that I come back to time and again. 

Here are some of my other first projects.

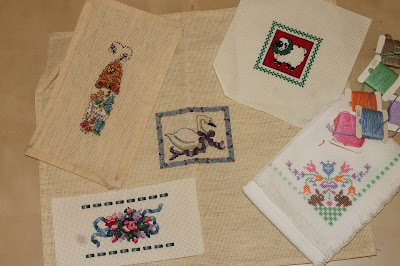
Geese, bunnies, sheep...very early 90's

You can probably tell by the style and subject matter that I began stitching in the early nineties.  I was a young bride and my husband and I moved about 250 miles away from our nearest family within the first year of our marriage to a very rural area of California.  (Yes, it’s true, not every square inch of the Golden State is covered in pavement.)

In some ways it was all an exciting adventure and in other ways it was very lonely.  I had studied graphic design in college and in our new town there wasn’t a lot of demand for my skills.  As my husband settled into his new job, I took a part-time job as a receptionist in a doctor’s office and looked for ways to release my pent up creative energy. 

I did tole painting and sold my creations.  I began, at the instigation of my Mom, to explore painting with thread.  It was fun and a lot less messy.  I subscribed to a cross stitch magazine and waited for the arrival of each issue with eagerness.  I even started designing some of my own charts, inspired by Bible verses or contests in the cross stitch magazine (which I never entered!).  And then low and behold…baby number one arrived.

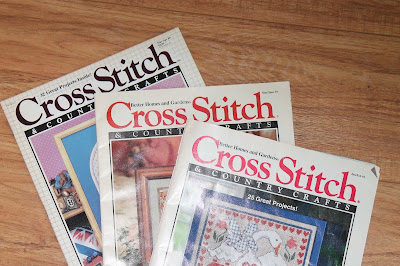
Cross Stitch & Country Crafts...definitely more cross stitch than anything else
Crafts of all kinds were put on hold as I poured myself into motherhood.  Occasionally I would do something as a gift but my creative energies were flowing in a new direction.  Baby number two arrived a few years later and soon the school years commenced.  I did a stint substitute teaching while my oldest, a son, was in Kindergarten through 4th grade.  But my heart and creative juices were drawn to homeschooling and so off we went! 

During our time of homeschooling (which isn’t quite completed) we adopted our 3rd child from Uganda.  Pretty soon I found I needed to explore a hobby for my health and sanity's sake. I went digging around in old drawers for my cross stitch. 

Painting with thread has some very appealing advantages.  It’s not messy and it’s easy to put down and pick up again without worrying about brushes drying out or taking up valuable space on the dining room table that you might want later for, oh say, having dinner.

As I perused through my drawers I found plenty of unfinished projects (which I still hope to finish someday!). Among them was a project I designed. 

A little light went on.  A little App on my iPhone glowed bright orange.  The creative juices were surging forth and the wheels of my brain began turning.
 
As you recall, I mentioned that I had sold my artistic endeavors before.  It involved traveling to craft fairs and making multiples of the same object.  I never seemed to really do better than support my crafty habit.  I learned then that the real profit was in selling patterns.  (It was about then that my son arrived.)

Etsy, the bright little orange App on my iPhone, provided the perfect platform for my thread painting designs.
 
And so, Luhu Stitches was born. Granted it is still in its infancy.  But this is one infant that sleeps through the night (thank the Lord in heaven!)
 
And I am so happy to introduce to you my very first design, and my oldest.  Yes, this is one of those projects that languished in my drawer all those years. 

It was inspired by a cross stitch magazine contest. As I recall the contest was to design a pattern based on a song.  When I originally designed it I chose an old Sunday School song.  As I worked to finish the sample recently, I decided to change out the wording to a simple Bible verse.  What I love about this design, after several years, are the colors. I am also partial to checks.  


I hope you will come visit my shop at Etsy.    


Monday, April 11, 2016

...and the next stitch makes an X

Welcome to the home of luhu stitches!

I am so happy to have you stop by and find out a little more about my little adventure in stitching.

I began my love affair with textiles and colors long ago on the lap of my mother.  She has, from my earliest memory, always had some sort of project going that involved thread, yarn, floss or string (and for a while in the 70's, macrame rope).

When she learned to crochet, she taught me how to crochet.  When she learned how to do crewel embroidery, she taught me how to do some simple embroidery.  I don't even remember when she taught me to sew.  When she started counted cross stitch, (way back in the late 80's) she tried to teach me.  However, by then, I was in college taking graphic design courses and I looked down my stubby nose at such homey crafts.  (She also tried to get me to try my hand at quilting.)

In design school I was immersed in the world of color, type, and layout.  Playing with paper, ink and paint was fun, if a bit messy.

After college and receiving my degree, I got married and my husband (a forester) got a job in an area that had very little call for graphic designers.  I managed to design a few business cards and some signage but finally ended up taking a job as a medical office receptionist in order to help pay the bills.

About this time my Mom and Dad came to visit us in our new mountain community and she brought along a copy of Better Homes and Gardens that had a counted cross stitch pattern in it.  For some reason it intrigued me.   Maybe it was because I was now living with a beautiful mountain peering in my front window.

Or because our only source of heat was a wood stove and cooling, a window fan. Or because I had just planted my very first garden.  Or because I was a newly wed and feeling that desire to explore all the home arts (I also took up home canning about this time!).  Whatever the reason, my Mom took advantage of the situation and we headed into town to find some embroidery floss, Aida clothe and a copy machine. 
And so I began.  I worked on my new project everywhere.  It went with me on visits to see family and friends, baseball games (go Giants!), picnics, camping and anywhere else I could take it.  Finally it was finished.


Sadly it has remained unframed, unpillowed, or unused all these years...don't ask me why. Kind of weird I know; but I do plan on framing it and mounting it on the wall above my desk to help inspire me in the next phase of my cross-stitching journey.

What next phase you ask?  Well stay-tuned and join me for my next blog installment and I'll share with you just what that is! 

Thank you for stopping by and reading!  Happy stitching!